Right-clicking on a project in the Project Explorer brings up a right-click menu with the Modelify menu. The image below shows the 5 options from the Modelify right-click menu. If the selected project does not have a config.modelify file, only the Convert Project to Simulink option is available.

This menu will create a new conversion file for the selected project(s). If a selected project is not a C/C++ project, a dialog will offer to convert it into C/C++ project. After the conversion file is created, the other 4 menu options become available.
For more information on using the Modelify editor to perform configuration and conversion see Modelify configurations.
This menu will clear project's conversion status. Conversion status of all functions in the selected project(s) will be set back to Staged. This will not affect any models or other files that have been created.
You also can clear conversion status for selected functions. To clear the conversion status of selected functions, right-click on the functions in the Conversion page of Modelify editor and then click on Clear Conversion Status.

This option will restore project's configuration back to default settings. Any customized settings will be removed.
The Modelify editor also provides buttons for clearing the configuration of the project or page. The buttons are available in the top-right corner of each page. The left button will reset the configuration for the current page and the right button will reset the configuration for the entire project.

The Initialization File is created to store necessary constants and types as an M script or Data Dictionary file. This menu will clear the types and constants used in the initialization files in the selected project. After doing this, converted models that require an entry in the Initialization File will not simulate unless they are re-converted.
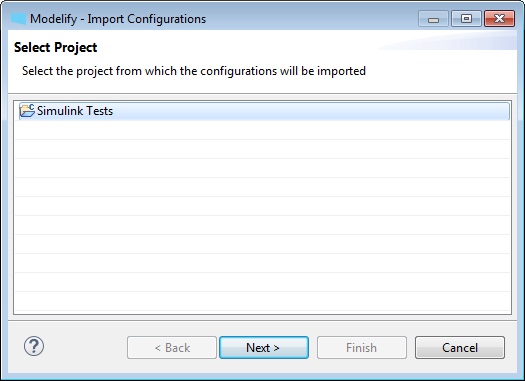
This option is used to import Modelify configuration from another project into the selected project. An Import Configuration wizard will open to select the project that the configuration is imported from. Below image is a screenshot of the first page in the wizard.

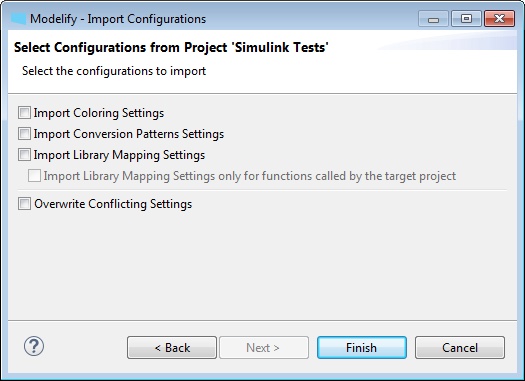
After selecting the project, click Next. In the next page, you can select which configuration will be imported. These options are Coloring, Conversion Patterns, and Library Mapping. Also you can select if you want to overwrite the conflicting setting. Click Finish to perform the import.
