Conversion Bundle
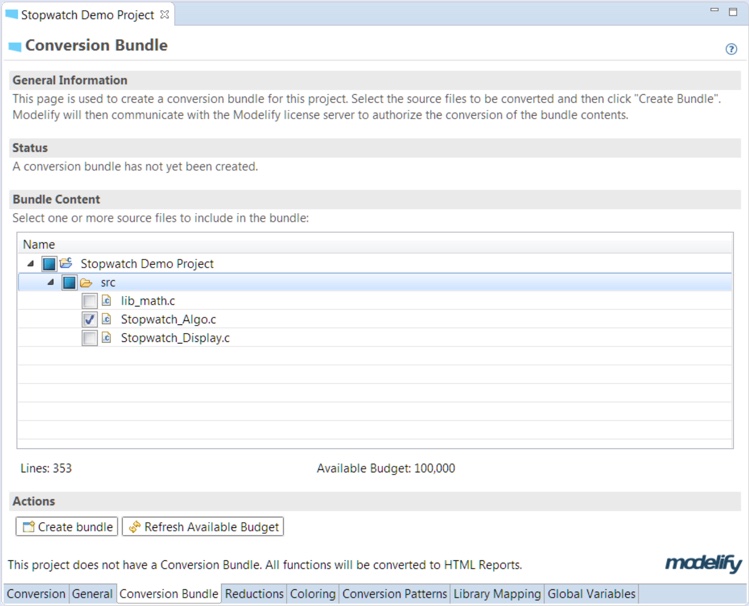
In order to convert your C code to Simulink models, you have to create a conversion bundle. The Conversion Bundle page allows you to create a bundle where you select which parts of a C project to convert to Simulink.
How much of the project can be converted depends on the user's license.
If the user is evaluating Modelify with an evaluation license, the conversion bundle will be limited to a small amount of code.
The number of lines you have available are shown at the bottom. The Refresh Available Budget button will update that value in case it's not shown.
The image below shows the Conversion Bundle page.

To create a conversion bundle:
- Select the source files that you want to include in the conversion bundle by clicking the checkboxes. As you select more files, the text field will show the number of lines that selected files contain (bundle size) at the bottom-left.
- Click the Create Bundle button.
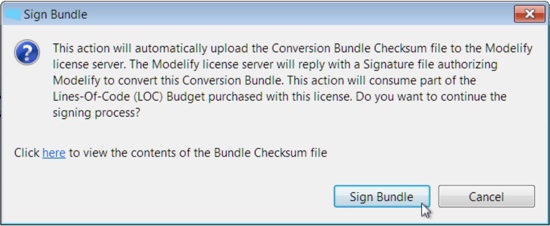
- Sign Bundle
- If your computer is connected to the Internet you can sign the bundle directly from Modelify. After creating the bundle, click the Sign Bundle button in the dialog that pops up.

- If your computer is not connected to the Internet or the Modelify license server cannot be reached by some reason, then you can follow the steps below
- Click the Advanced >>> button.
- Click the Export checksum file button from the new set of buttons that are displayed to save it to disk.

- Email the saved conversion bundle checksum file to EnSoft at support@ensoftcorp.com
- When you get the approved conversion bundle signature file from EnSoft, click the Import signature file button.
- Remap your workspace and files included in the bundle can now be converted to Simulink.
The bundle checksum file that is sent to EnSoft does not contain any of the source code. It simply contains a hash of the source code so that Modelify can verify that the conversion bundle file matches the current project's code.
This does allow for some editing to the code so that the user can adjust the code if needed or observe how Modelify generates models for different source code. Modelify will allow for up to 1% of the code to be changed after the bundle is signed.
Rebasing a Conversion Bundle
If you need to make changes amounting to more than 1% to your code after the bundle is signed, then you will need to use Rebase.
For example, suppose you have a bundle with 10,000 lines and you have modified 150 lines (this is more than the allowed 1%). If your current line budget is at least 150 lines, then you can use it to rebase your bundle.
The bundle rebase operation requires signing the newly created bundle checksum file.
The signing operation will only consume the number of lines that were changed.
To rebase your existing bundle simply click the Rebase bundle button and then sign the new bundle.
A dialog to sign the bundle will automatically pop up. Alternatively, you can send EnSoft the file to be signed (details about signing steps above).
The conversion bundle page includes information about the number of lines included in your bundle, the number of lines changed since the bundle was created and your available line budget.
Clearing a Conversion Bundle
If you exported the conversion bundle checksum file and then decided to include more files in it, click the Clear bundle button to start a new bundle. This should generally only be done before the bundle has been signed. See the "WARNING" section below.
WARNING
The loss of important Conversion Bundle files will create licensing problems and may require the purchase of a new license. EnSoft support does not have a copy of the master archive file because it includes user source code.
When a Conversion Bundle is created, Modelify creates a master archive file of the source code stored within the project (.modelify/bundle-master-file.zip). The checksum file that is sent to EnSoft will contain only a checksum calculated from the master archive file. After the Conversion Bundle has been signed, Modelify will compare the current source code to the code stored in the archive file. This is how Modelify determines how much the source code has been changed. If this file is missing, Modelify will not be able to validate the Conversion Bundle and will not allow the user to convert the code to Simulink models.
It is not possible to reconstruct a Conversion Bundle after clearing or deleting it. This means that if the master archive file is lost, then the lines-of-code budget used to create this Conversion Bundle will also be lost.
Due to the fact that the source code and master archive files are never sent to EnSoft, EnSoft does not have a backup of the bundle files and so we recommend that Modelify users either backup the master file or are careful never to delete it.


