About SimDiff
SimDiff has become the leading diff and merge tool for Simulink models since its first release in 2005. SimDiff’s accuracy, speed, and robustness have made it the preferred choice amongst the world’s leading companies in the automotive, aerospace, and defense industries.
This demo gives an overview of some of its features. Request a free trial and try it on your models!
REQUEST SIMDIFF TRIAL
SimDiff can be used for comparing, filtering changes, auditing, reporting, and merging Simulink models.
Comparing Models with SimDiff
SimDiff supports comparison of models in either .mdl or .slx format. There are 2 modes to choose from – Comparison and Merge. Comparison mode is optimized for reviewing changes, while merge mode allows you to merge changes.
Reviewing Changes
The SimDiff results window contains two trees for you to see the results.
The left tree is your Simulink model with the changes that you have made. The right tree is the Simulink model with changes made by your colleague. Each difference is numbered and colored. Blue indicates a change, red a deletion, and green an addition. You can customize these colors in the Preferences. SimDiff also includes a legend (button at top-right corner) that describes the colors and icons in SimDiff.
There is a status bar at the bottom of the window which shows how long the comparison took and how many changes have been made to the models. You can mouse over each item for more detail.
One of the exceptional features of SimDiff is its speed. Comparison of sample models that come with SimDiff takes less than half a second, but even with large models SimDiff runs quickly. SimDiff can compare models with thousands of blocks in 2.5 seconds or less, and 20 MB MDL files with more than 30,000 blocks in less than 10 seconds. This fast and accurate comparison is a result of the graph theory research at EnSoft.
REQUEST SIMDIFF TRIAL
Let’s look at a specific change.
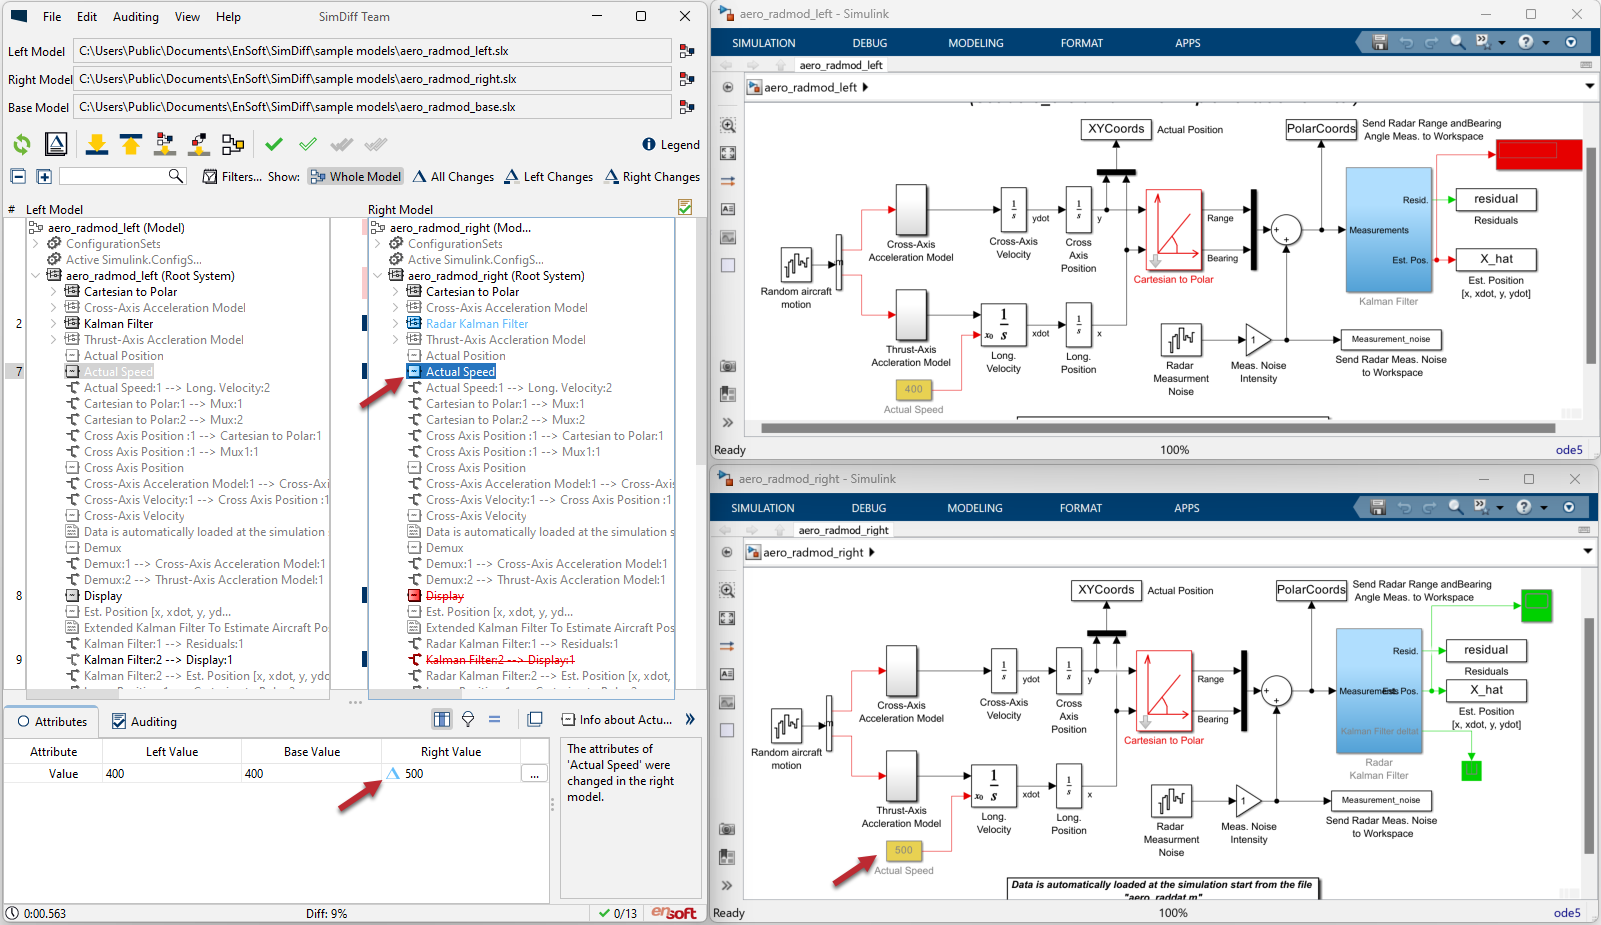
The Actual Speed block is highlighted light blue. This means the block has one or more changed attributes. You can click on the block in either tree and SimDiff will show a comparison of the attributes at the bottom of the window. The Attributes panel shows that the constant block value was changed from 400 to 500.
You can view differences in Simulink by double-clicking them, or by clicking on the toolbar button while the difference is selected. SimDiff has highlighted the currently-selected block in Simulink. By default it also highlights changed, deleted, and added blocks to match the colors used in SimDiff’s two trees. SimDiff provides navigation buttons in the toolbar to step through changes one at a time.
Let’s now look at another kind of change where parallel edits were done in the same block.
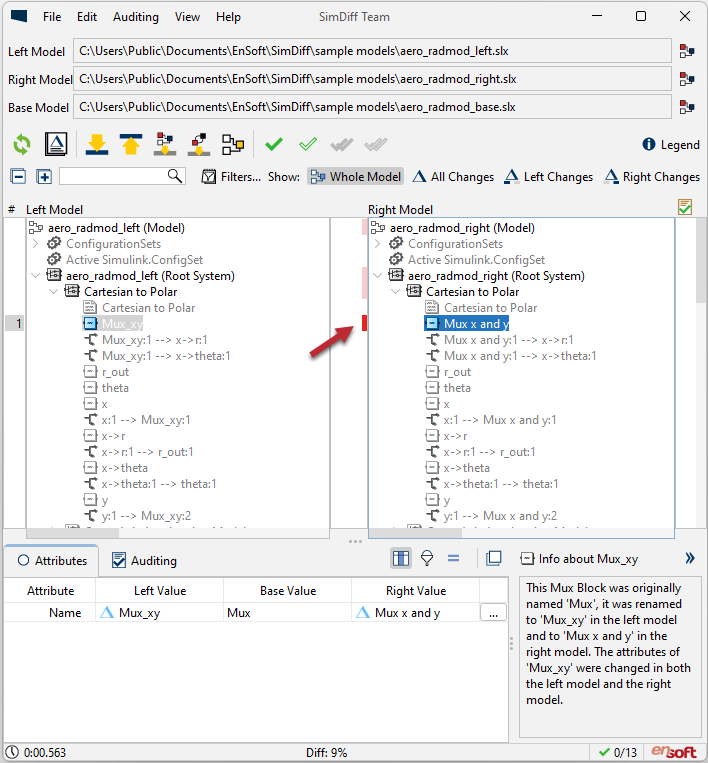
The red bar indicates that this is a conflicting change. The Attributes panel shows that the conflict occurs because the name was changed in both the left and the right models.
Filtering Changes
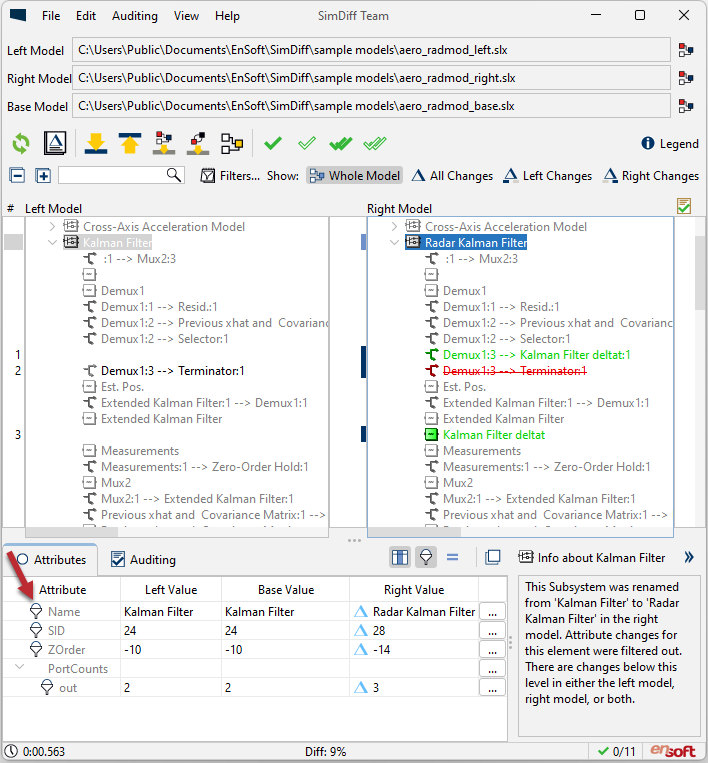
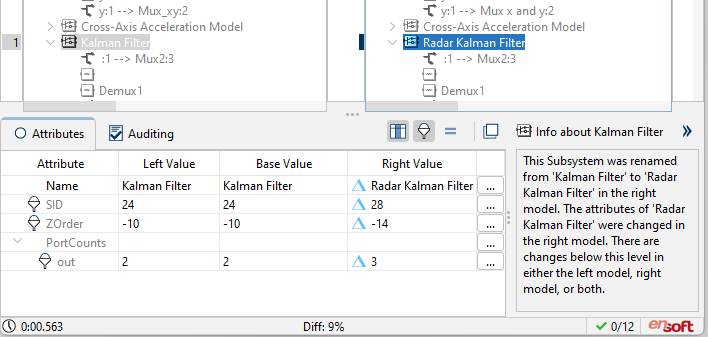
Suppose that you want to ignore differences in block names. You can right-click the Name attribute in the Attributes panel and add it to a filter. With the name attribute filtered out, SimDiff no longer considers the block to be changed. By default, an attribute filter applies to all element types.
For example, the Kalman Filter subsystem’s name was changed from Kalman Filter to Radar Kalman Filter. This change is filtered out, as you can see by the filter icon in the Attributes Panel.
This change will affect the interface in generated code since the function name will be based on the subsystem name, so you probably want to limit the name filter to certain types of blocks. You’ll need to fine-tune the filter. This can be done from the Filters Editor (Edit > Filters…).
From the Filters Editor you can add, edit, and remove filters. You can also enable and disable them as needed. SimDiff comes with built-in filters that exclude attribute sets that are almost always unimportant. You can disable the built-in filters if necessary.
In this case, you want to modify the Name filter so it only applies to certain types of elements. Right now, the filter applies to all elements. Let’s exclude subsystems from the filter. You can type the name of an element or copy and paste it from the list on the right side.
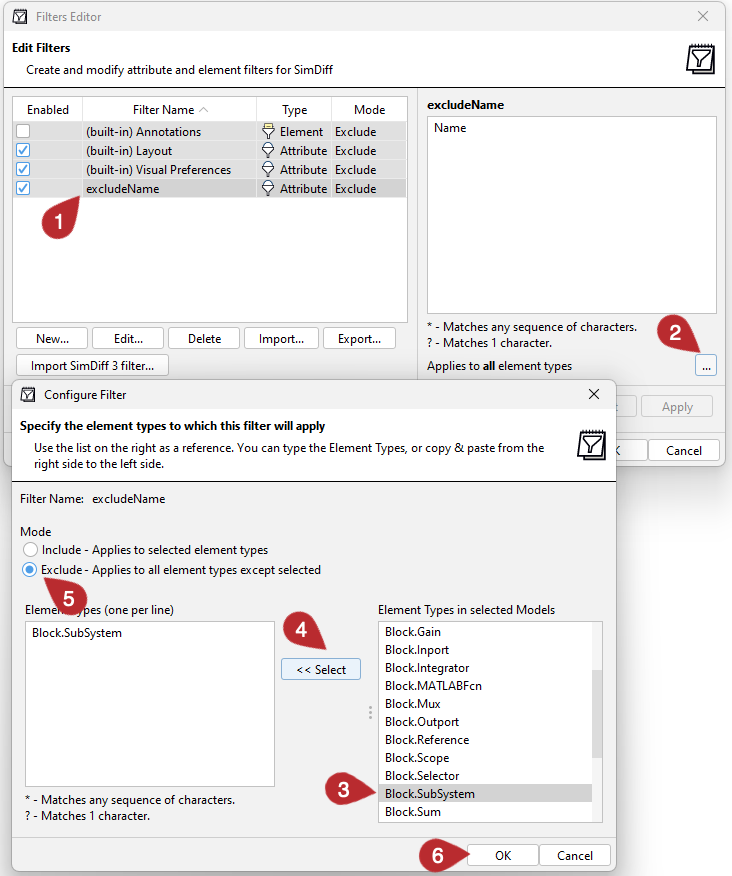
Notice that the subsystem name is no longer filtered, and SimDiff detects the change in the subsystem block.
REQUEST SIMDIFF TRIAL
Auditing
SimDiff shows all model contents by default, including blocks with no differences. However, it provides buttons on top of the trees to customize the view.
For example, clicking the “All Changes” button will adjust the view to only show items with changes.
This view is helpful during a review process.
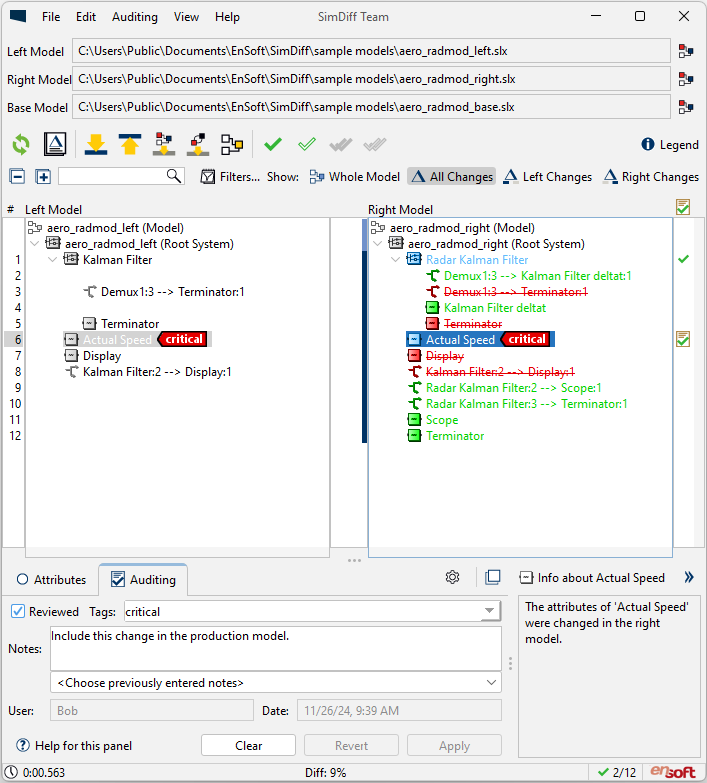
Reviewers can keep track of their progress by checking off changes on the right column as they review them. Review progress is shown in the status bar.
The auditing panel allows you to add auditing information, such as tags and notes, for the selected model element(s). The username and date are automatically filled in.
You can save the auditing information to an XML file, and later load it back into SimDiff. You can also include the auditing information in a change report, which can be saved in either HTML or XML format. HTML is the preferred format for viewing, while XML is more convenient for automated post-processing with an external tool.
Reports
SimDiff allows generating a report of the comparison. The report includes information about the models, a legend, a summary of the differences, and detailed tables. There is also a linked table of contents for easy navigation.
Just as in the SimDiff application, the differences are numbered. You can click screenshot images to view them at full resolution.
Version Control System Integration
SimDiff allows integration with several version control systems. You can visit our version control system integration page to find documentation outlining how to set up different version control systems with SimDiff.
If you have questions about the existing documentation, or if your version control system is not listed, please contact EnSoft support.
Merging Changes
In Merge mode, we need to specify where the merged results will be stored. By convention, this is usually the left model. However, you can also provide a separate output model file.
Merge mode has most of the same capabilities as Comparison mode, but also allows us to merge changes from the right model into the left model (or output model). You can follow merge progress in the status bar.
To look at an example, let’s find some interesting changes to merge. A Terminator block was removed from inside the Radar Kalman Filter subsystem, and a new Terminator block was added outside the subsystem. This Terminator block should be added to the model. To do this, you can simply click on the merge arrow and SimDiff adds the change.
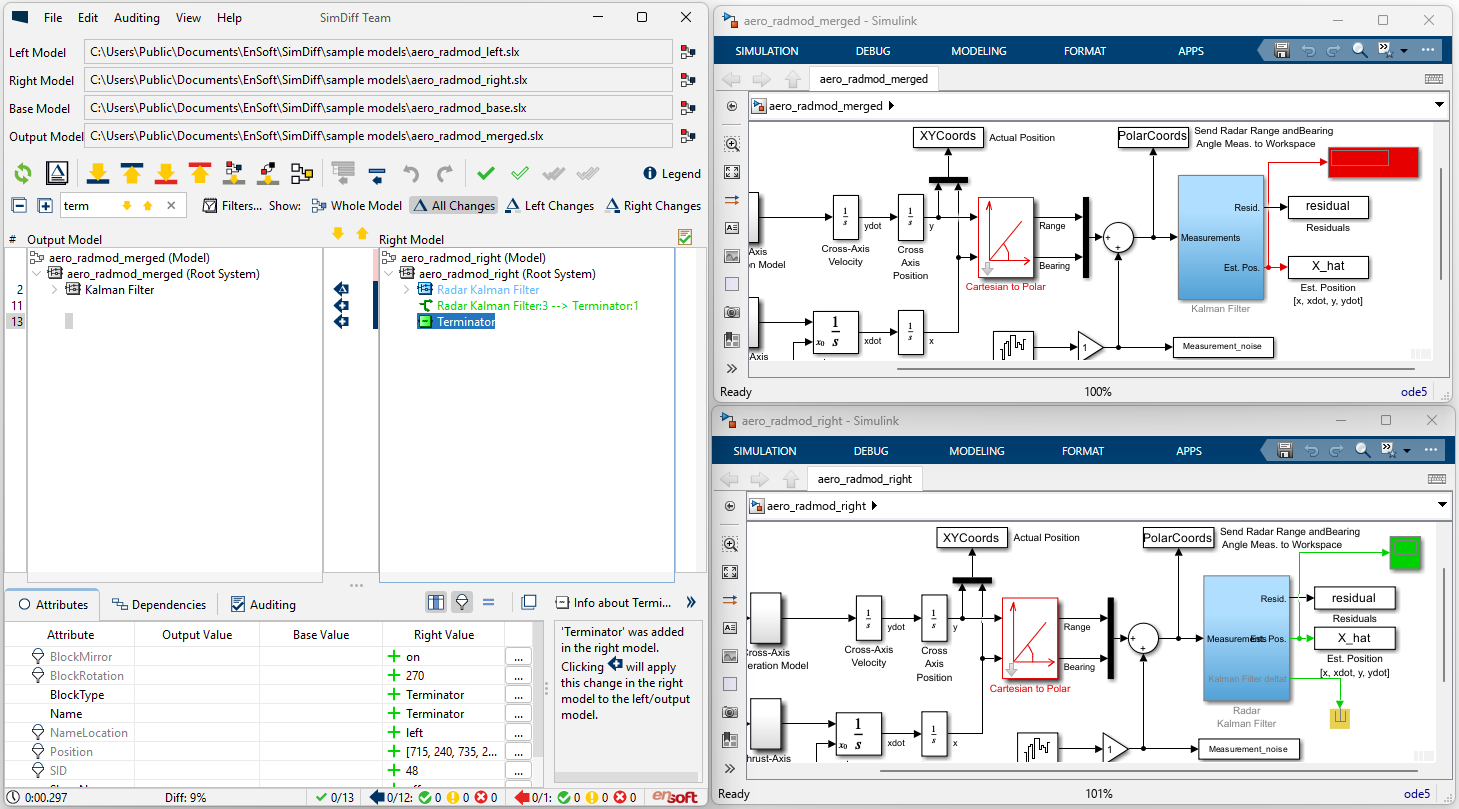
SimDiff applies the merge actions in Simulink. These modifications appear as unsaved changes in the Simulink model. You can see the merged block in the model and move it around.
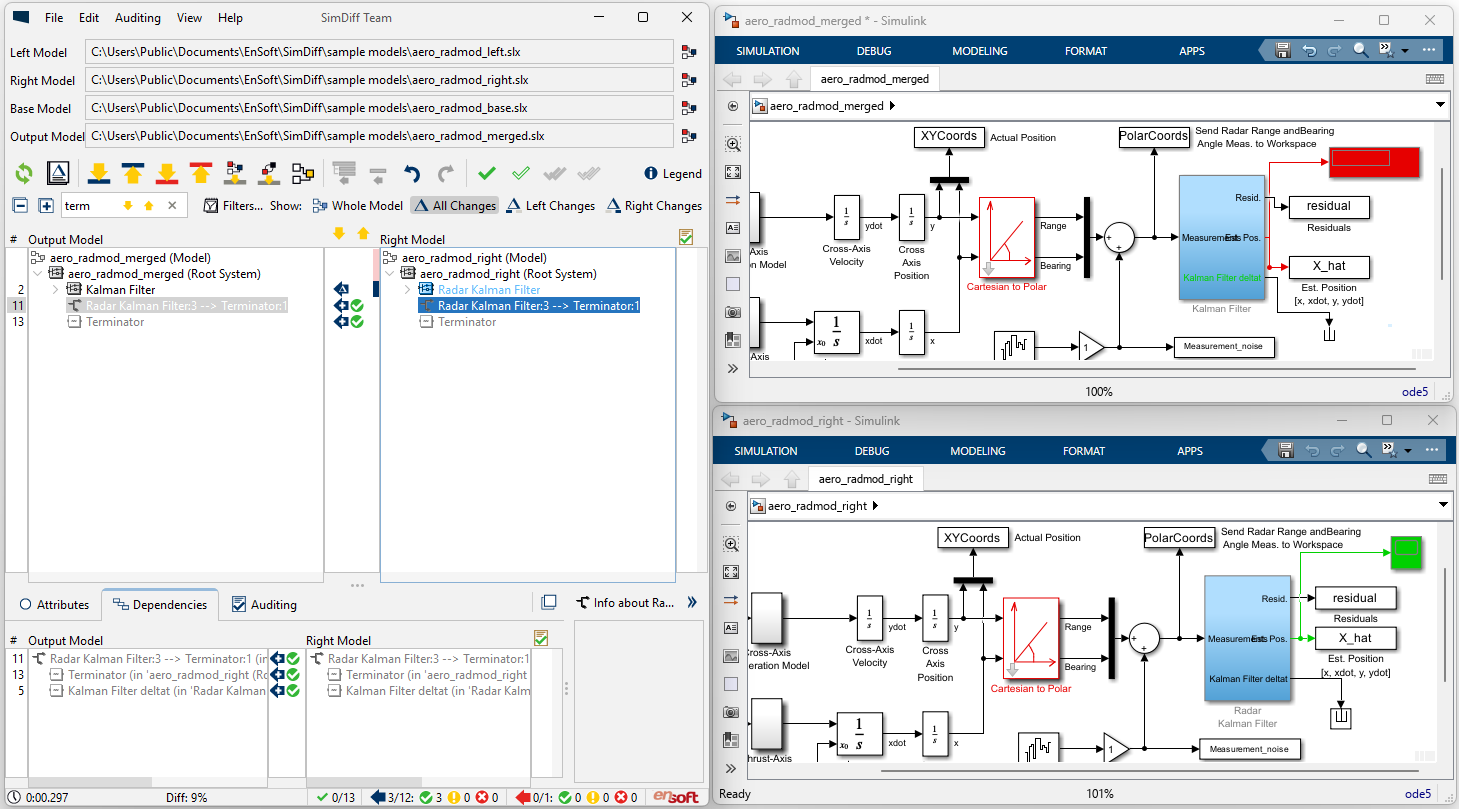
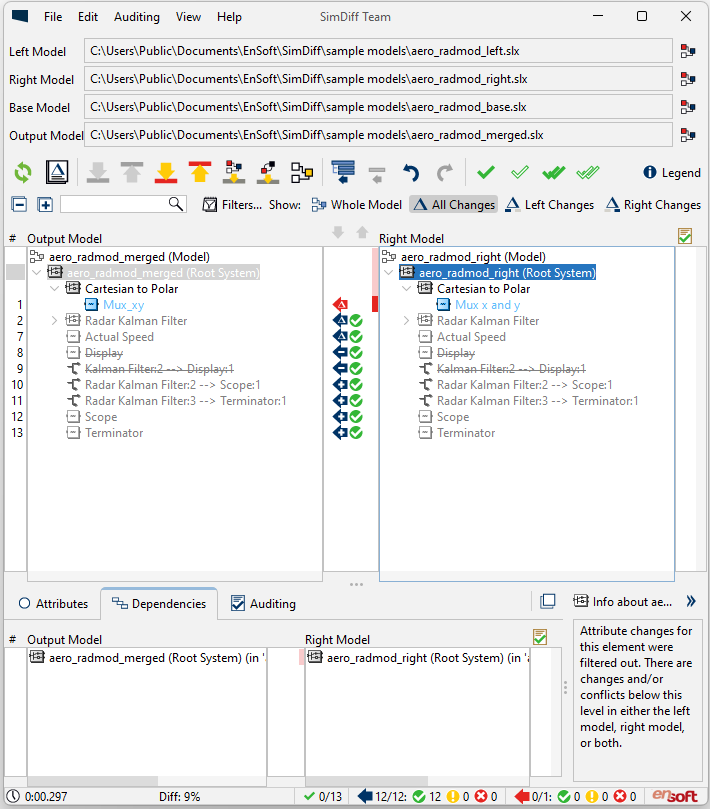
This signal is connected to the Terminator block, and also to a port that doesn’t yet exist in the output model’s Kalman Filter. What happens if you try to merge it using SimDiff? SimDiff detects the dependency and creates the third out port that you need.
You can see the dependencies that SimDiff detects by looking at the Dependencies tab at the bottom of the SimDiff window.
Here you see that the copied line depends on both the Terminator block and the third out port of the Kalman Filter. This is how SimDiff knew to create the out port and to give it the correct name. You can also undo and redo merge operations.
There are still a few changes in our example model that haven’t been merged yet. You can merge the contents of an entire subsystem, including subsystems beneath it, using the “Hierarchy Merge” button.
The status bar shows that SimDiff merged all the non-conflicting changes, but there’s still one conflicting change left. For safety, Hierarchy Merge skips conflicting changes since only you can determine which change is correct. You can use the Next Conflict button to jump to the conflicting changes. In this case, it’s a single conflict on a Mux block.
Let’s say your colleague’s change looks better than your change, so you go ahead and merge the conflicting change. Now all the changes are merged. When you are finished merging, you can simply save the output model.
This was just a quick overview of SimDiff. SimDiff also has several other capabilities which we didn’t cover, such as exporting highlighted copies of your models, subsystem diff, workspace comparison, breaking library links, and MATLAB and command-line interfaces.
To try SimDiff on your own models:
REQUEST SIMDIFF TRIAL
Licensing & Pricing
Click here for information on pricing and products.
System Requirements
SimDiff runs on a wide variety of software and hardware configurations.
Version Control System Integration
SimDiff allows integration with several version control systems.
How to Buy SimDiff
Click here if you would like to request a quote before ordering.
Download SimDiff
SimDiff can be downloaded by accessing the following links.